Showing posts with label Open Source Tools. Show all posts

Tuesday, September 17, 2013

Mostly Asked interview questions                                             How to recover delete files in linux

There are many open source applications in Linux available for graphic designer or image editing purpose.  Some of them, I have mentioned below and I will come with detailed description about them in later articles.

InkScape:

Inkscape is an open source application for graphic designers. It can replace to Adobe Illustrator or Corel Draw. Actually, Inkscape is a vector graphics editor. Vector graphics means resolution is independent on description of the actual shapes and objects in the image.
Inkscape supports many advanced features like alpha blending, clones, markers, object creation (Paths, Rectangles, 3D boxes, Stars/Polygons, spirals, clones, text), Object Manipulation (moving of object), styling object (fill, stroke fill, opacity), operations on paths, text support, Rendering etc.
You can visit Inkscape official site here.

Blender:

Blender is an open source tool which mostly used for 3D graphics design, for creating animated films, interactive 3D applications and games etc. I will prefer this tool if you want to create 3D animation film or games. Blender is available for Linux as well as Windows.
Blender is providing wide variety of advanced features like 3D animation creation, smoke simulation, provides game engine, python scripting tool for game logic, importing/exporting from other formats, task automation and custom tools, camera and object tracking, 3D rendering, procedural and node based textures, as well as texture painting, projective painting, vertex painting, weight painting.



Blender is mostly used open source tool for graphic designing.

ImageMagick

ImageMagick is a open source tool used to create, edit, compose, add special effects in image, adjust image colors, draw lines or polygons, add text in image and many more. ImageMagick is generally used like Adobe Photoshop to edit and add special effects in image. It is not having functionality that much of adobe photoshop but it is good to use as an open source tool.
ImageMagick can help us to do things like image format conversion, transform, draw, add special effects, animations, add texts and comments, overlap an image over another, motion picture support, large image support.

Know more about the ImageMagick

GIMP

GIMP stands for GNU Image Manipulation Program. It is a good graphics manipulation package. GIMP is mostly used for image editing or while adding special effects in image.
GIMP has many features like photo enhancement, digital retouching, hardware support, file formats. It is available in Linux. Windows, Sun Soalris, Mac OS X, Free BSD.

Click here to know more about the GIMP.

AERO 

A Physically based simulation and animation system. AERO is a simulation program based on rigid body systems.

You might have interested in this post. Have a look on it :

How to run windows applications on Linux                          Check java process statistics in Linux
Posted by Machindra Dharmadhikari On 9/17/2013 09:47:00 PM No comments READ FULL POST

Monday, June 3, 2013

Netstat Command in Linux                                                               vmstat Command in Linux

It is very easy to check local network speed in Windows but if you have putty access to Linux machine then we are facing issues to check the network speed. There are some tools are available to check network speed iin Linux but it is not possible to install this tools on client machine or our secured machine.

Network speed in linux is depend on the Ethernet card or network interface card which you are using for this machine. Might be there are multiple Ethernet cards already configured, we can check network speed for each separately.

Generally, Ethernet cards are configured. If we see the the output of below command then we will get all NICs.

root@hello:~# ifconfig -a
eth0   Link encap:EthernetHWaddr 1c:6f:65:0b:00:eb
          inet addr:10.136.25.42  Bcast:10.136.25.255  Mask:255.255.255.0
          inet6 addr: fe80::1e6f:65ff:fe0b:eb/64 Scope:Link
          UP BROADCAST RUNNING MULTICAST  MTU:1500  Metric:1
          RX packets:1133376 errors:0 dropped:0 overruns:0 frame:0
          TX packets:34516 errors:0 dropped:0 overruns:0 carrier:0
          collisions:0 txqueuelen:1000
          RX bytes:11234117 (113.8 MB)  TX bytes:9056744 (9.0 MB)
          Interrupt:16 Memory:fc500000-fc520000

lo       Link encap:Local Loopback     
          inet addr:127.0.0.1  Mask:255.255.0.0
          inet6 addr: ::1/128 Scope:Host
          UP LOOPBACK RUNNING  MTU:16436  Metric:1
          RX packets:20442 errors:0 dropped:0 overruns:0 frame:0
          TX packets:20442 errors:0 dropped:0 overruns:0 carrier:0
          collisions:0 txqueuelen:0
          RX bytes:2356951 (2.3 MB)  TX bytes:2356951 (2.3 MB)
root@hello:~#

If we see in above output, there are two cards configured. But eth0 is the main. So we need to check network speed for it only.

For Ethernet card,

root@hello:~# ethtool eth0 | less

If this command is not found then go for below command

root@hello:~# dmesg  | grep -i duplex
[   16.773492] e100e: eth0 NIC Link is Up 100 Mbps Full Duplex, Flow Control: None
root@hello:~#

Above command will be helpful to check system is half duplex or full duplex. Dmesg command gives lots of information but it is not that much of useful for us just grep needed information.

                We can check network speed of wireless card and chipset information.

                root@hello:~#lspci | grep -i wireless

                To test internet connection speed from the console over ssh command line, we need to install lftp and iperf packages. They are easily available. We can download rpm of them or install it from yum repository.

After installation, download or upload data by lftp, pget command or check network speed between two IPs by iperf command.


I got some useful information regarding this topic on one site. Please go through it.

Check CPU usage in Linux                                                                usermod command in Linux
Posted by Machindra Dharmadhikari On 6/03/2013 08:38:00 PM 3 comments READ FULL POST

Friday, April 5, 2013

How to recover deleted files in Linux                                            mpstat command details

When we start the Linux machine/server that time we need  some services should have to start automatically. But for this purpose, we have to do some changes in Linux settings. There are two ways to add service to startup or disable service to startup in Linux. First one is through GUI i.e. if you have access to server directly then you can do it through GUI otherwise we have to run some commands.

Add service to startup in Red hat Linux through GUI

Steps to follow: 
1.       Login to server by root user. (Any authorized user)
2.       Move Cursor on “System”, submenu will appear. Last submenu – “Startup Applications”. Click on it. 


3.       After this, you will get small window, in this tick the services which you want to start at startup or if there is no service which you want then add that service in by clicking on “Add” button. Fill the details and click on “OK”.


Now suppose if you want to enable the service to startup or disable the service then run following command on terminal. 
1.       To check all the services in server by running command : chkconfig. It will display all details about runlevels and service is on or off for that particular run level.


2.       Type the command to turn off startup service as already present. 

[root@rhel ~]# chkconfig --level 34 NetworkManager off


This command will disable the NetworkManager service for runlevel 3 and 4 only.

If you want to enable  any service then use “on” instead of “off” and change the level as per your requirement.

Check CPU usage details                                              Check Linux System Performance
Posted by Machindra Dharmadhikari On 4/05/2013 01:06:00 AM No comments READ FULL POST

Friday, March 22, 2013

mpstat command to check cpu usage                                        vmstat command to check cpu performance


There are many commands available to get network statistics and particular port details. In this article, we are not going in deep to understand these commands but we will just understand the overall functionality of these command.

Nmap Command

Nmap is, especially network exploration tool but it can be used as a security or port scanner. We can scan entire network or selected machine or single server by nmap command. It is also useful for scanning firewall rules.
Nmap is designed to allow system administrators:
·         To scan large networks to determine which servers or hosts are running and what services they are offering. 
·         Nmap supports a large number of scanning techniques such as: UDP, TCP, TCP SYN (half open), ftp proxy (bounce attack), ICMP (ping sweep), FIN,  ACK  sweep,  Xmas Tree, SYN sweep, IP Protocol, and Null scan. 
·         Nmap also offers a number of advanced features such as remote OS detection via TCP/IP fingerprinting, stealth scanning, dynamic delay and retransmission calculations, parallel scanning, detection  of down hosts via parallel pings, decoy scanning, port filtering detection, direct (non-portmapper) RPC scanning, fragmentation scanning, and flexible target and port specification.

Netstat Command

A netstat is a command line tool which provides information about incoming and outgoing network connections, routing tables, network protocol statistics and network interface. Following are some of the features of netstat command.
Features of netstat command:
  • Displays routing information maintained by Kernel. (netstat –r)
  • Display multicast group membership information.(netstat –g)
  • It is displays information related to all network statistics/interfaces. (netstat –s/netstat –i)
  • It can monitor system continuously by netstat –tc command. (c – Option most important.)
  • It displays the network time related information.


A nc is a command line tool to check TCP and UDP connections and listens it. It can open TCP connections, send UDP packets, listens on TCP and UDP ports, do port scanning and source routing.

Common uses of nc command include:
Ø  Simple TCP proxies
Ø  Shell script based HTTP clients and servers
Ø   Source routing based connectivity testing


Following are some of the best network scanners as :


Unicornscan is a new information gathering and correlation engine built for and by members of the security research and testing communities. It was designed to provide an engine that is Scalable, Accurate, Flexible, and Efficient. It is released for the community to use under the terms of the GPL license.
Get more information related to this tool by clicking here: unicornscan 


Zenmap is the Nmap Security Scanner GUI. It is available in multi-platform  for Linux, Windows, Mac OS X, BSD, etc. It is free and open source application and it is designed to make Nmap easy for beginners to use while providing advanced features for experienced Nmap users. Frequently used scans can be saved as profiles to make them easy to run repeatedly. A command creator allows interactive creation of nmap command lines. Scan results can be saved and viewed later. Saved scan results can be compared with one another to see how they differ. The results of recent scans are stored in a searchable database.

Nast – Network Analyzer Sniffer Tool

Nast is a packet sniffer and a LAN analyzer based on Libnet and Libpcap. It can sniff in normal mode or in promiscuous mode the packets on a network interface and log it. It dumps the headers of packets and  the payload in ascii or ascii-hex format. You can apply a filter. The sniffed data can be saved in a parated file.
As analyzer Tool, it has many features like as:
·         Follows a TCP-DATA stream
·         Find LAN Internet gateways
·         Discover promiscuous nodes
·         Reset an established connection
·         Perform a single half-open portscanner
·         Perform a multi half-open portscanner
·         Find link type (hub or switch)
·         Catch daemon banner of LAN nodes
·         Build LAN hosts list


Knocker


Knocker is a simple and easy to use TCP security port scanner written in C to analyze hosts and all of the different services started on them. It is available for Linux, FreeBSD, HP-UX, and Windows9x/2000/NT and it is licensed under the GNU General Public License GPL.
Click here to  know more about Knocker

Linux boot Loader                                                                        file system in Linux
Posted by Machindra Dharmadhikari On 3/22/2013 01:55:00 PM No comments READ FULL POST

Monday, March 18, 2013


Run Unix Commands on Windows                                    Grub Boot Loader

People always complain that there are not enough softwares available in Linux/Unix which we require for daily life but it is not true. There are enough softwares  available in Unix and all these softwares are open source. We can easily download and install it and suppose, in Linux repository, we couldn’t find the required package then install windows software on Linux that will be the best way. So, we are going to understand how to install wine application which is creating windows like environment on Unix for windows applications.
Wine is the package which used for creating environment of Windows on Linux. It is open source package. Installation and configuration of wine is quite easy. you can download winehq from here.

Features of Wine

·         Wine allows you to run many Windows programs on Linux.
·         If we are using latest version of Wine then we can get assistance from winehq channel on irc.freenode.net.
If you need complete installation of Windows then you can look for Qemu as well. It is also an open source application.

Install Wine on Ubuntu Server

Let’s install wine on Ubuntu server first:
It is very easy to install Wine on Ubuntu Server. Need to follow below steps to install it :

Step 1: Run below command to update repository.

sudo add-apt-repository ppa:ubuntu-wine/ppa

This PPA can be added to your system manually by copying the lines below and adding them to your system's software sources. For each Ubuntu server it will change if you are installing it on Quantal 12.10 Ubuntu then following lines will be added in your system’s software sources:


These lines will be different as per your version of OS.

Step 2: update APT package information by running.

sudo apt-get update

Step 3  : We can now install Wine directly. Run below command.

sudo apt-get install wine1.5

Wine is installed on Ubuntu. Please check for application, it will come in list.

Configuration of Wine in Ubuntu

Before using Wine, we need to configure it. It needs fake c: drive where windows application will be installed. To create fake drive, run following command.

winecfg

We have another method as well to do this by going to Applicationsà Accessories Ã  Terminal
We have configure wine option in the Applications Ã  Wine menu
The above command will create a hidden folder for wine  in home directory of current user. Once directory created then wine configuration window will appear and customize settings as you need.  If you want change the application specific changes then also run above command. Pop will come for menus and then click on Add application and navigate to where exe resides and then select it. Change the settings as per your requirement.

Install windows application in Wine

Now it is time to install windows application in Wine.
Step 1: Download the exe or any kind of installable file of windows for the application.
Step 2: Save at somewhere and cd to that directory through terminal.
Step 3: Type as follow:

                Wine name-of-application.(extension)                                  e.g.  wine vlc.exe

While installation, if application asks for directory to save files then select C: drive. (We already created C: drive). Whenever you want to run this application then go to that directory and above command or go to wine browser and double click on launch icon it will start that application.

Uninstall Wine

If you want to uninstall the wine then run following command it will uninstall it. Run terminal and run command.

wine uninstaller


Posted by Machindra Dharmadhikari On 3/18/2013 12:55:00 AM 3 comments READ FULL POST

Wednesday, December 19, 2012

Recover deleted files in Linux                                    10 steps to create Logical Volume


Cygwin is the best application which creates unix like environment in Windows OS. We can run almost all commands on Cygwin. Processing of files in windows will be easy if we use unix commands to process.

You can use openssh server in cygwin and create password less connection as well. There are many features of Cygwin that we will discuss in other article.

Please see below  for  brief information about installation of cygwin.

How to install cygwin ?
1.        It is very easy step. Go to this link Download Cygwin
2.       Download setup.exe only.
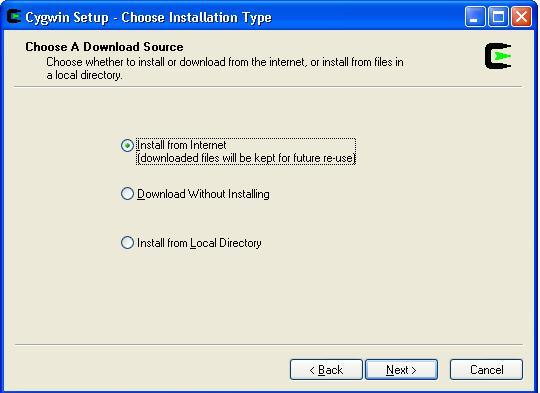
3.       Run the setup.exe and you can see first pop up as follows:


Click here to know more about: Jstat Command in Linux


4.       Select Install from Local directory, if you have already downloaded all packages otherwise select first option i.e. Install from Internet and click next.
 
5.       After that you will get next window where setup is asking for root directory if you have selected the Install from local directory. Otherwise give the path where you want to keep all cygwin related files and then click on next.
 

6.       Now it will ask for Internet settings if you have i.e. for proxy settings if you have. Otherwise select Direct Connection option.
 
7.       Now you will get mirror list. Select any mirror and click on next.
 
8.       It is the last step and most important step about Cygwin installation. Please be careful while selecting the packages which you need with cygwin. If you have not selected respective package then you will not get the commands of that package in your cygwin and you will get error message like "Command not found". If you are going to select all packages then Cygwin will take too much time to complete and you will install unnecessary packages as well.
 

After selection of packages, installation process will start. click on next and then finish. 
and then you will get the desktop icon for Cygwin Launch. Double click on this and Cygwin will start  and start to run unix commands on Windows
 

If you need any help regarding Cygwin then you can reach me on linuxconcepts@gmail.com.


FTP server Concept                  Bash Shell features                      File System in Linux


Posted by Machindra Dharmadhikari On 12/19/2012 06:38:00 PM 3 comments READ FULL POST
  • RSS
  • Delicious
  • Digg
  • Facebook
  • Twitter
  • Linkedin
  • Youtube

    Chitika Ads 2

    Histat

    About

    Enter your email address:

    Delivered by FeedBurner